इस पोस्ट में हम flutter widgets के concept को जानेंगे और widgets को कैसे बनाया जाता है| जैसा की हम सभी सभी जानते है की flutter में सबसे important widgets ही होते है |
जब भी हम flutter में कुछ भी बनाने के लिए code करते है तो वह एक widget के अन्दर ही होता है| इसमें हम widgets का प्रयोग करके app को बनाना सीखेंगे | Widget यह सुनिषित करता है की वर्तमान configuration और state के हिसाब से हमारा application कैसा दिखेगा |जब हम अपने code में किसी तरह का कुछ भी बदलाव करते है तो, widget पिछले और current widget के बीच के अंतर को calculate करके फिर से इसके description को बनाता है |
किसी भी flutter एप्लीकेशन में widgets एक दूसरे से nested condition में रहते है जिसे हम आगे समझेंगे की कैसे widgets nested होते है | Nested का मतलब है की हमारे app का root भी एक widget ही होता है, और अन्य widgets root widget के अन्दर होते है |
उदाहरण के लिए एक widget किसी भी चीज को display क्र सकता है, interactions को handle कर सकता है, और कोई भी design बना सकता है |
हम flutter app की hierarchy को graphical representation की सहायता से आसानी से समझ सकते है |
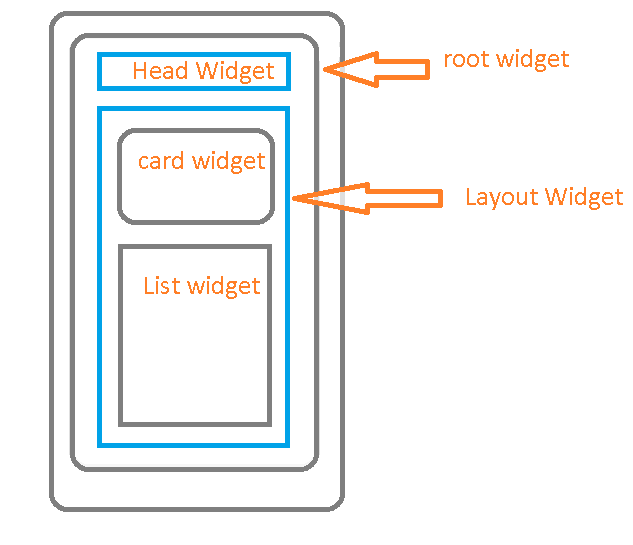
ऊपर दिए गये डायग्राम से widgets जी hierarchy को आसानी से समझ सकते है | अब हम देखेंगे की हम किसी flutter app में widgets को कैसे बना सकते है , इसे हम साधारण से उदहारण से समझते है –
class FancyButton extends StatelessWidget{
   // Other stuff
}
Built in Widgets in Flutter
जब भी हम कोई flutter project बनाते है तो हमे flutter हमे कुछ built in widgets पहले से ही provide करता है, जिसका प्रयोग करके हम custom UI बना सकते है |
कुछ basic flutter widgets उनके उपयोग के आधार पर निम्न है –
- Layout – Scaffold, Row, Column, Stack
- Style – TextStyle, Color
- Structure – Button, Toast, MenuDrawer
- Position and Alignment – Center, Padding
- Animation – transformation, FadeInPhoto
How to code a widgets –
जब हम flutter में code कर रहे होते है तो हमे कुछ custom widgets बनाने पड़ते है | flutter में widgets सामन्यतः dart class ही होते है जो Widget class को extend करते है | जैसे अगर हम कोई button widget बनाना चाहते है जिसे हम अपने according styling देना चाहते है तो हम कुछ इस तरह से class define कर सकते है –
class CustomButton extends StatelessWidget{
  //rest of the code
}
इस code में शायद आपको StatelessWidget ना पता हो, लेकिन हमे इसका use बहुत करना पड़ेगा जिसके बारे में मई आपको दूसरे पोस्ट में बताऊंगा |
जब भी हम कोई widget बनाते है तो widget superclass द्वारा एक requirement होती है कि हमारे पास एक build method जरुर होना चाहिए | यह method other widgets को भी return करती है | build method की सहायता से ही हम अलग-अलग widgets को use करके एक UI create करते है |
class CustomButton extends StatelessWidget {
  Widget build(BuildContext context) {
    return Center(
      child: Container(
        child: ElevatedButton(
          onPressed: () {},
          child: Text("Geeks Partner"),
        ),
      ),
    );
  }
}
आप इस widget में और भी methods और properties add कर सकते है | अब हम देखते है कि हमारा पूरा code कैसा दिखता है, जिसे हम run करा सकते है और output को emulator या physical device पर देख सकते है | इस code को हम lib folder के अन्दर main.dart में लिखेंगे |
import 'package:flutter/material.dart';

void main() {
  runApp(MyApp());
}

class MyApp extends StatelessWidget {
  // This widget is the root of your application.
  @override
  Widget build(BuildContext context) {
    return MaterialApp(
      home: CustomButton(),
    );
  }
}

class CustomButton extends StatelessWidget {
  Widget build(BuildContext context) {
    return Center(
      child: Container(
        child: ElevatedButton(
          onPressed: () {},
          child: Text("Geeks Partner"),
        ),
      ),
    );
  }
}
Conclusion –
इस पोस्ट में हमने flutter में widgets क्या होते है और इसे कैसे बना सकते है, इसे पढने के बाद हमे widgets का थोडा बहुत concept clear हुआ होगा |
- Flutter-Dart Programming Introduction-Hindi
- Flutter Architecture in Hindi
- How to setup Flutter in Android Studio-Hindi
- How to install flutter on windows in Hindi
- Introduction of UI/UX
- How to Create Dynamic Chart in Excel
Thank you! #geekspartner
Leave a Reply